So simple, but good :) Definitely a do-it-yourself project!!
via
Posts mit dem Label DIY werden angezeigt. Alle Posts anzeigen
Mittwoch, 3. August 2011
Dienstag, 28. Juni 2011
DIY Plant pot coffee table
So simpel, so cool! Here is the materials list:
via"Materials:4 plant pots "BJURÖN", 4 legs of an older IKEA-couchtable (with screws etc.) and minimum 8 screws and nuts and driller for wood "
Dienstag, 14. Juni 2011
Montag, 25. April 2011
DIY Camera Softbox
Materials:
Ikea Komplement collapsable fabrix box
Description:
Use a fold-able 'Komplement' box from Ikea as the softbox. The box comes in various sizes. The one the author at IKEA hackers used is about 20x20cm in size. Easy!
I will try this out!!
via
Ikea Komplement collapsable fabrix box
Description:
Use a fold-able 'Komplement' box from Ikea as the softbox. The box comes in various sizes. The one the author at IKEA hackers used is about 20x20cm in size. Easy!
I will try this out!!
via
Mittwoch, 2. Februar 2011
Ikea Hack 2
Klackbo Seat Hack!
Materials: 4 laminate bent Ikea legs and two seats from antique banker's chairs
Pure awesomeness. Unfortunatelly, they do not sell the seat anymore. eBay here I come! I want this. Steffen, look out for a Klackbo in Darmstadt :)
via ikea hack
Materials: 4 laminate bent Ikea legs and two seats from antique banker's chairs
Pure awesomeness. Unfortunatelly, they do not sell the seat anymore. eBay here I come! I want this. Steffen, look out for a Klackbo in Darmstadt :)
via ikea hack
Mittwoch, 27. Oktober 2010
TZ Wallet Sneak Peak
Well, my friends Eric, Jan and I were annoyed of our too big wallets lately. Whenever we go out, we leave our 3cm thick wallet at home and just take some money, a bank card and a passport or ID with us.
Two weeks ago I lost 10€ , because the bank note was by itself in my trouser pocket, together with my phone. Accidentally, I must have pulled out my phone TOGETHER with the 10€ note and lost it. This made us thinking about a TZ wallet...
NOW, this wont happen anymore. We have worked on 2 versions of a simple, party-night-capable wallet which suits our needs.
The one below is actually version nr.2! It is a prototype. Color and inscription are not final yet. We also still work on better stitching with other thread colors.
The credit as well as the ID card fit perfectly under the middle leather piece together with plenty bank notes (enough for one night out).
Some more pictures, as well of version nr.1, are about to come. Any thoughts, criticism or comments?
BE TIMELESS!
Sonntag, 17. Oktober 2010
Tetris Bookshelf
You know my brothers skills from the DIY Drawer Cabinet.
Now, he has send me a new inspiration he got from the web:
The TETRIS Bookshelf!
Basically, each shelf segment is autonomous and you can postition it just as simple as in the game Tetris. You can basically change the shape of your shelf daily. How call is that?!?! I mean nobody would really change it daily, but occasionally if the need for change exists!
Where did you see this Steffen?
Anyway, below are some pictures!
TZ-Berlin
Now, he has send me a new inspiration he got from the web:
The TETRIS Bookshelf!
Basically, each shelf segment is autonomous and you can postition it just as simple as in the game Tetris. You can basically change the shape of your shelf daily. How call is that?!?! I mean nobody would really change it daily, but occasionally if the need for change exists!
Where did you see this Steffen?
Anyway, below are some pictures!
TZ-Berlin
Mittwoch, 13. Oktober 2010
DIY Skateboard Stairs
If YOU happen to have little space and and some skateboards laying around, make your own DIY skateboard stairs like Marc from Stuttgart who is blogging on gehirnakrobat. Awesome project.


via Stilsucht
via Stilsucht
Dienstag, 28. September 2010
TZ Notiz Heft
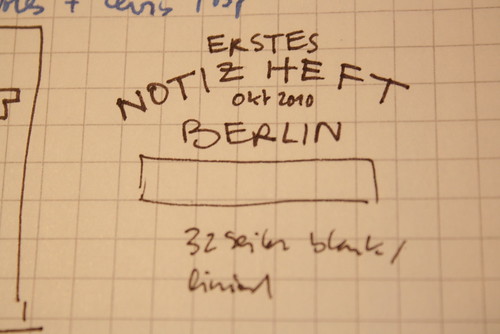
As my girlfriend and close friends know, I always scribble my ideas and thoughts down. Since those journals or notebooks from the store are too boring for me and have no history I thought about making a "TZ Notiz Heft" which is German for journal. The layout and everything is still in the making but I wanted to post the status as it is so far.
I want to print a few more to give them to friends for their birthday or maybe anybody just needs a Notiz Heft like me from time to time.
There is just one problem: How do I print a small quantity, lets say 10, for little money?
I thought of 3 ways: 1.) DIY Screenprint, 2.) Transfer Print using transparent sheet for an overhead projector OR 3.) Linoleum Print ( which is hardly impossible because of the small words)
any more ideas?
These were my first sketches in my journal:


And here is my first rough draft and my first try to print it using a transparent sheet and my normal printer at home:


As you can see, the typing is not final at all. I wrote it by Hand and will make it professional when I am sure about layout and design.
I am still on the hunt for more vintage inspiration from the old GDR and FRG. I already purchased an old "Heft" from eBay which is dated 1958 and maybe I like the font or the layout or get some other inspiration.
I want to print a few more to give them to friends for their birthday or maybe anybody just needs a Notiz Heft like me from time to time.
There is just one problem: How do I print a small quantity, lets say 10, for little money?
I thought of 3 ways: 1.) DIY Screenprint, 2.) Transfer Print using transparent sheet for an overhead projector OR 3.) Linoleum Print ( which is hardly impossible because of the small words)
any more ideas?
These were my first sketches in my journal:
And here is my first rough draft and my first try to print it using a transparent sheet and my normal printer at home:
As you can see, the typing is not final at all. I wrote it by Hand and will make it professional when I am sure about layout and design.
I am still on the hunt for more vintage inspiration from the old GDR and FRG. I already purchased an old "Heft" from eBay which is dated 1958 and maybe I like the font or the layout or get some other inspiration.
Samstag, 25. September 2010
Wooden Bike Shelf
I have to post this since I have a bike which is worth showing off and since this shelf is looking so good!!
Here is what Chris Brigham from knifeandsaw says about this shelf on his site:
While visiting many friends small apartments here in SF and more so in NY, I noticed that there is a void when it comes to elegant bike management. Bikes always get in the way – either in the hall, or leaning up against a bookshelf or something. So, I decided to design something to fix that problem. Until I think of a better name, I am calling it the Bike Shelf.Email him for inquiries or orders. The walnut version is 300$ and the ash versions costs 270$!
Montag, 20. September 2010
TZ Berlin Sweatshirt
Some time ago my girlfriend requested this sweatshirt from me. First, it was a sketch on a small piece of paper, but she liked it. And since we went out for a really nice dinner yesterday, I finally managed to complete the design in big scale.
With the help of a friend I printed it on a grey H&M sweatshirt. I also wanted the whole thing still look like a sketch, therefore the type is not "accurate" as well.
She likes it, and that is what counts.
Any more sweatshirt requests ;) ?
Samstag, 18. September 2010
Wood Box Cabinet
Marcantonio Raimondi Malerba used a vintage wood box for this project. Some old sideboard legs and his creativity finish the look
Check out his site at MaRaMa Export
via Stilsucht
Check out his site at MaRaMa Export
via Stilsucht
Sonntag, 5. September 2010
Repurposing a Palett for a DIY Chair
Will be on my to do list. Love it. I just need more SPAACEE!
Have seen it on a blog I have just discovered:
thegetupandgetdown
I like what they say on their site: Learn how to make something, or just get it from someone who already nows it.
Thats what its about!
Mittwoch, 25. August 2010
Project: One Idea a Day
Two young designers-One idea a day:
Erika Zorzi and Matteo Sangalli come up with a creative idea every single day. Scrolling through the posts is so entertaining. Their ideas are random but still creative.
Visit their project on MATHERY!
Fake Eco Charger
Plumber Chair
Grassslipper
Vynyl Pizza Cutter
Melon Jug
via swissmiss
Erika Zorzi and Matteo Sangalli come up with a creative idea every single day. Scrolling through the posts is so entertaining. Their ideas are random but still creative.
Visit their project on MATHERY!
Fake Eco Charger
Plumber Chair
Grassslipper
Vynyl Pizza Cutter
Melon Jug
via swissmiss
Montag, 23. August 2010
The DIY Drawer Cabinet
A little while ago I posted about the TREND to recycle drawers!
My brother loved this idea so much, he decided to build his own unique drawer cabinet by scrap.
Living in Darmstadt made it easy to assemble beautiful vintage drawers in the streets in a short time. In a weeks time he had all the drawers together and began building.
Its so easy to gather old drawers in Darmstadt since the people put their old furniture out in the street,early before they are supposed to be picked up by the garbage collection. Mostly, one of the over 30.000 students picks it up to take it to his dorm to add it to their random furniture collection.
Anyway, my brother just needed to think of the dimensions and of how to arrange the drawers to begin.
It came out so nice I cant hold it back from you.
My brother is happy about every share as much as I am!
If you have any questions for my brother or want to see some more pictures regarding the cabinet, do not hesitate to contact us via the contact sheet in the menu on top of the site.
Enjoy:
This is what you'll need for an unique DIY vintage drawe cabinet like this:
Of course you'll need tools as
+a hammer
+some nails
+wood glue
+wood
+some old drawers or cabinet doors
+wooden anchors
+metal angles
+power drill
(+anything fancy you want to add like the bamboo grill he placed in the sides to secure a good air flow inside the cabinet plus for the good look)

Before building you need to get a hold of some old drawers or cabinet doors or both. You should design your whole cabinet around those main design details.
Go and buy the wood plus all the rest you need.
A very important step is to calculate all the cuts you have to make in the wood very carefully to achieve a smooth outline with no wood part standing out.
You also have to place wood strips inside the cabinet as a guidance for the drawers and to install the metal angles for the cabinet doors.
My brothers goal was a clean white surface without any visible screws or nails, basically without anything that destroys the clean white design in combination with the vintage drawers and cabinet doors.
Therefore, he didnt use any nails on any visible place. Wood anchors with wood glue hold the side walls of the cabinet together.
All in all it took him one week to build this cabinet and I think he can be very proud of himself. I am proud of you and envious I dont have enough room for something like this in my place.
More DIY projects to come from Steffen right from Darmstadt and also from myself, from Berlin.
DARE TO BE GREAT
My brother loved this idea so much, he decided to build his own unique drawer cabinet by scrap.
Living in Darmstadt made it easy to assemble beautiful vintage drawers in the streets in a short time. In a weeks time he had all the drawers together and began building.
Its so easy to gather old drawers in Darmstadt since the people put their old furniture out in the street,early before they are supposed to be picked up by the garbage collection. Mostly, one of the over 30.000 students picks it up to take it to his dorm to add it to their random furniture collection.
Anyway, my brother just needed to think of the dimensions and of how to arrange the drawers to begin.
It came out so nice I cant hold it back from you.
My brother is happy about every share as much as I am!
If you have any questions for my brother or want to see some more pictures regarding the cabinet, do not hesitate to contact us via the contact sheet in the menu on top of the site.
Enjoy:
This is what you'll need for an unique DIY vintage drawe cabinet like this:
Of course you'll need tools as
+a hammer
+some nails
+wood glue
+wood
+some old drawers or cabinet doors
+wooden anchors
+metal angles
+power drill
(+anything fancy you want to add like the bamboo grill he placed in the sides to secure a good air flow inside the cabinet plus for the good look)
Before building you need to get a hold of some old drawers or cabinet doors or both. You should design your whole cabinet around those main design details.
Go and buy the wood plus all the rest you need.
A very important step is to calculate all the cuts you have to make in the wood very carefully to achieve a smooth outline with no wood part standing out.
You also have to place wood strips inside the cabinet as a guidance for the drawers and to install the metal angles for the cabinet doors.
Therefore, he didnt use any nails on any visible place. Wood anchors with wood glue hold the side walls of the cabinet together.
All in all it took him one week to build this cabinet and I think he can be very proud of himself. I am proud of you and envious I dont have enough room for something like this in my place.
More DIY projects to come from Steffen right from Darmstadt and also from myself, from Berlin.
DARE TO BE GREAT
Freitag, 9. Juli 2010
DIY Roll Up Backgammon
What should you do with your spare time in the summer?
I am gonna try to gather some felt or cloth and some retro Backgammon tokens.
What you need?
-felt, cloth or leather
-a scissor
-some cloth glue and little little craft skills plus a little creativity
Hope to get your creative minds going. I Hope it might look a little like the one below when I am finished. Its available on MATT SINGER's website for as little as 165$. I prefer to spend 10 € on cloth or felt and have a good time putting it together. I think I am going to try some fency colors...
I might add a TZ logo on the tokens as well...
I am gonna try to gather some felt or cloth and some retro Backgammon tokens.
What you need?
-felt, cloth or leather
-a scissor
-some cloth glue and little little craft skills plus a little creativity
Hope to get your creative minds going. I Hope it might look a little like the one below when I am finished. Its available on MATT SINGER's website for as little as 165$. I prefer to spend 10 € on cloth or felt and have a good time putting it together. I think I am going to try some fency colors...
I might add a TZ logo on the tokens as well...
Sonntag, 4. Juli 2010
TZ loves wood shelves
I love wood shelves. They need to be simple and rustic for my taste.
The shelve above is from Holzwerk-A, a manufacturer based in Goettingen Germany.
But what do you do, if you cant afford a custom made piece of furniture?
Just ask your local fruit and vegetable shopman for old woodden cases, check out grandma's attic or browse your favourite online auction website.
Its simple as that. Use just one as a nightstand or several as a whole shelve for your favourite books and records.
A little story might show you how easy it is to be successful with such simple ideas:
In 2006, the designer Jasper Morrison was asked to design a night stand. After testing several ideas, he discovered that the old wine case/box, which was sitting next to his bed was defying all competition. Basically he reproduced the box with high quality wood and was selling it under the name "The Crate".
Rethinking what is given. Simple and smart and easy to reproduce at home with just a single old case/box.
source of pictures: Stilsucht, hyggelig , Jasper Morrison
have seen the wonderful idea of an old box nightstand in the great book "Mach neu aus alt" by H. Thompson with illustrations from N. Whittington
If you like this post you might also like my article about "Recycle old drawers".
The shelve above is from Holzwerk-A, a manufacturer based in Goettingen Germany.
But what do you do, if you cant afford a custom made piece of furniture?
Just ask your local fruit and vegetable shopman for old woodden cases, check out grandma's attic or browse your favourite online auction website.
Its simple as that. Use just one as a nightstand or several as a whole shelve for your favourite books and records.
A little story might show you how easy it is to be successful with such simple ideas:In 2006, the designer Jasper Morrison was asked to design a night stand. After testing several ideas, he discovered that the old wine case/box, which was sitting next to his bed was defying all competition. Basically he reproduced the box with high quality wood and was selling it under the name "The Crate".
Rethinking what is given. Simple and smart and easy to reproduce at home with just a single old case/box.
source of pictures: Stilsucht, hyggelig , Jasper Morrison
have seen the wonderful idea of an old box nightstand in the great book "Mach neu aus alt" by H. Thompson with illustrations from N. Whittington
If you like this post you might also like my article about "Recycle old drawers".
Sonntag, 20. Juni 2010
Save Bookmark DIY
Many of you probably have bookmarks laying around, which you got with your last purchase of a book?!
But there are other options, one is totally free and you just need a printer, a piece of paper and a scissor.
Simple and funny! Enjoy and comment if you like it or even have printed it out.

via Stilsucht and idea from Icoeye
But there are other options, one is totally free and you just need a printer, a piece of paper and a scissor.
Simple and funny! Enjoy and comment if you like it or even have printed it out.

via Stilsucht and idea from Icoeye
Sonntag, 6. Juni 2010
Bike Project- Sticker just arrived
The Logo for the front did not come out well though. Will have to get it done once more but the rest is great.
The bikes name is going to be BIROTA 1.0.
Birota is latin for bike, wheel, bicycle or cycle!
My brother is also working on a bike which is going to be named BIROTA 2.0!
What do you think, is the name oldschool enough?
I think it sounds good :)
Will provide pictures with the logo and the finished bike soon.
The bikes name is going to be BIROTA 1.0.
Birota is latin for bike, wheel, bicycle or cycle!
My brother is also working on a bike which is going to be named BIROTA 2.0!
What do you think, is the name oldschool enough?
I think it sounds good :)
Will provide pictures with the logo and the finished bike soon.
Labels:
Birota,
Custom Bikes,
DIY,
Do it yourself,
Selfmade,
Trendzeta
Freitag, 4. Juni 2010
Antón García Abril "La Trufa"
Well if I would have enough money I would go out in the woods and start building this amazing piece of art that I have just seen on the web.
In English this piece is called "The Truffle".
Antón García Abril is a Spanish musician and composer but his creative mind produced this "building" as well.
The Truffle involved pouring concrete over hay bales stacked and burried inside soil from the surroundings.
Some more steps created a space within a stone that sits on the ground and blends with the territory.
Enjoy this video and the urgent felling of wanting to go out and get creative.
Also see Dezeen for more information and pictures.
In English this piece is called "The Truffle".
Antón García Abril is a Spanish musician and composer but his creative mind produced this "building" as well.
The Truffle involved pouring concrete over hay bales stacked and burried inside soil from the surroundings.
Some more steps created a space within a stone that sits on the ground and blends with the territory.
Enjoy this video and the urgent felling of wanting to go out and get creative.
Also see Dezeen for more information and pictures.
Labels:
Architecture,
Art,
DIY,
Do it yourself,
La Trufa,
Trüffel
Abonnieren
Posts (Atom)